
How I Survived an 8-Hour Fake Cloudflare Attack on My WordPress Site


Last week I almost lost a WordPress site I had been working on for years.
I opened one of my niche sites in an incognito tab to check a post. Instead of the homepage, I got a black screen with a Cloudflare logo. It said “Verify you are human.” A spinning wheel below.
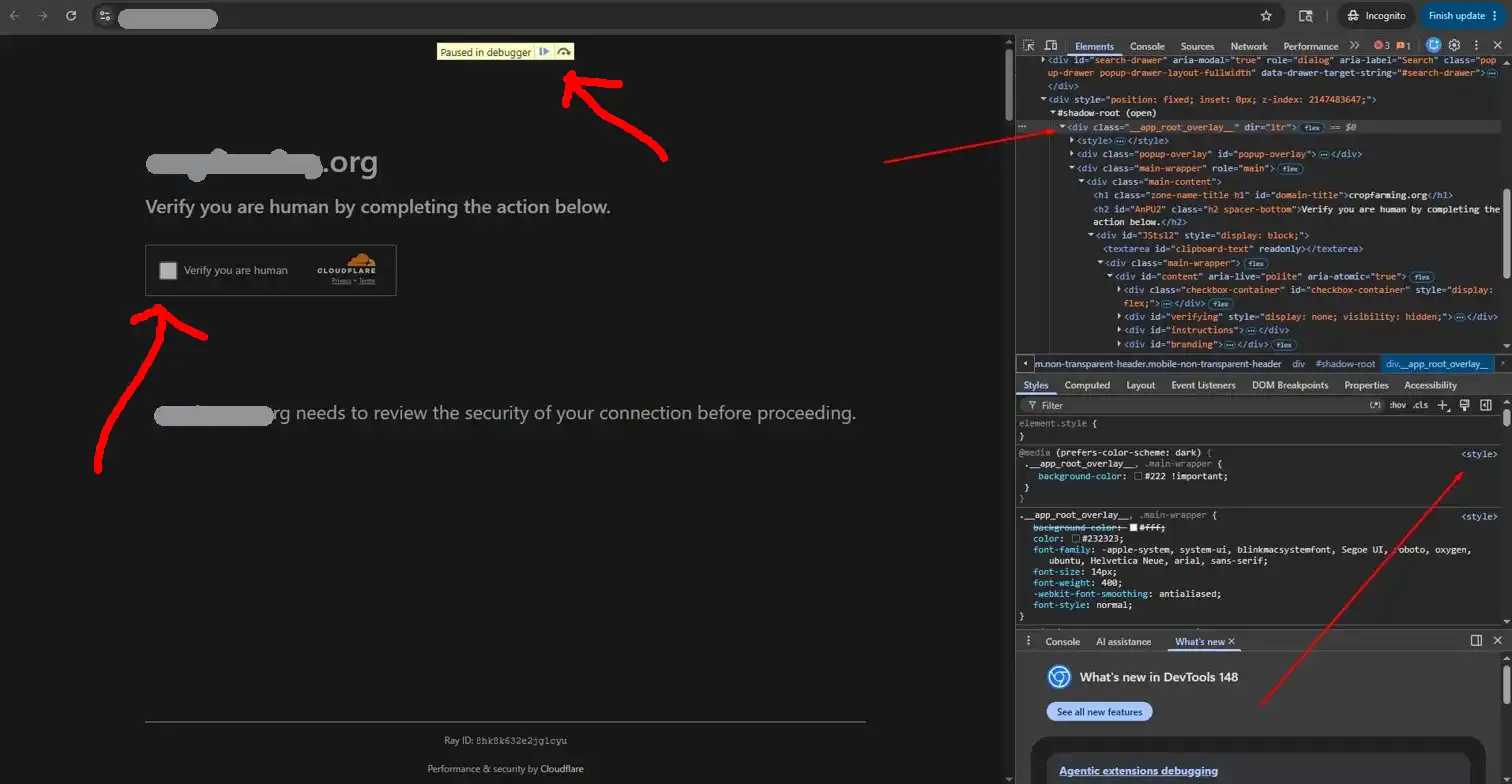
My first thought was that Cloudflare had been added by my host. Then I remembered: I do not use Cloudflare on this site. There is no reason this page should exist.
That is when I realized I had been hit by one of the most clever WordPress attacks of 2025-2026. It is called the ClickFix attack, and it pretends to be a Cloudflare captcha to trick your visitors into installing malware on their own computers.
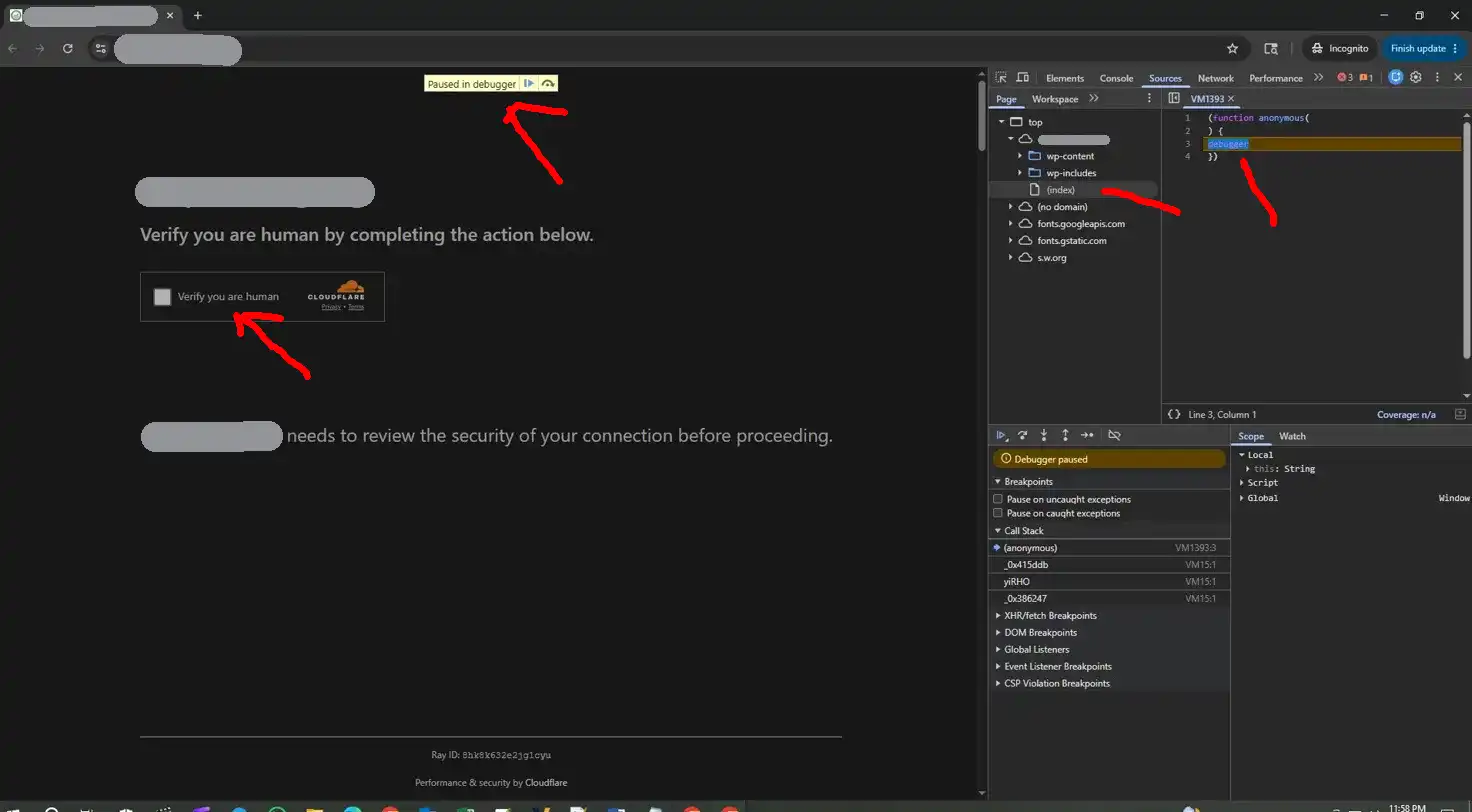
I spent the next 8 hours trying to clean it. Most things did not work. In the end, I solved it by building two plugins. I am giving both away free so you do not have to go through what I did.
Let me explain what happened, what this attack actually does, and how the plugins fix it.
What the Fake Cloudflare Attack Actually Does
This is not a real Cloudflare verification. It is malware injected into your WordPress site that hijacks your visitor’s clipboard.
Here is the attack flow, step by step:
- A visitor lands on your site
- Instead of your content, they see a fake “Cloudflare” verification page
- The page asks them to:
- Press
Win + R(opens the Windows Run dialog) - Press
Ctrl + V(pastes from clipboard) - Click OK
- Press
- While the visitor is reading these instructions, malicious JavaScript silently copies a PowerShell command into their clipboard
- When they paste and run it, a malicious script downloads. Usually an infostealer like Lumma, Vidar, or Redline. These steal passwords, crypto wallets, browser cookies, and saved logins.
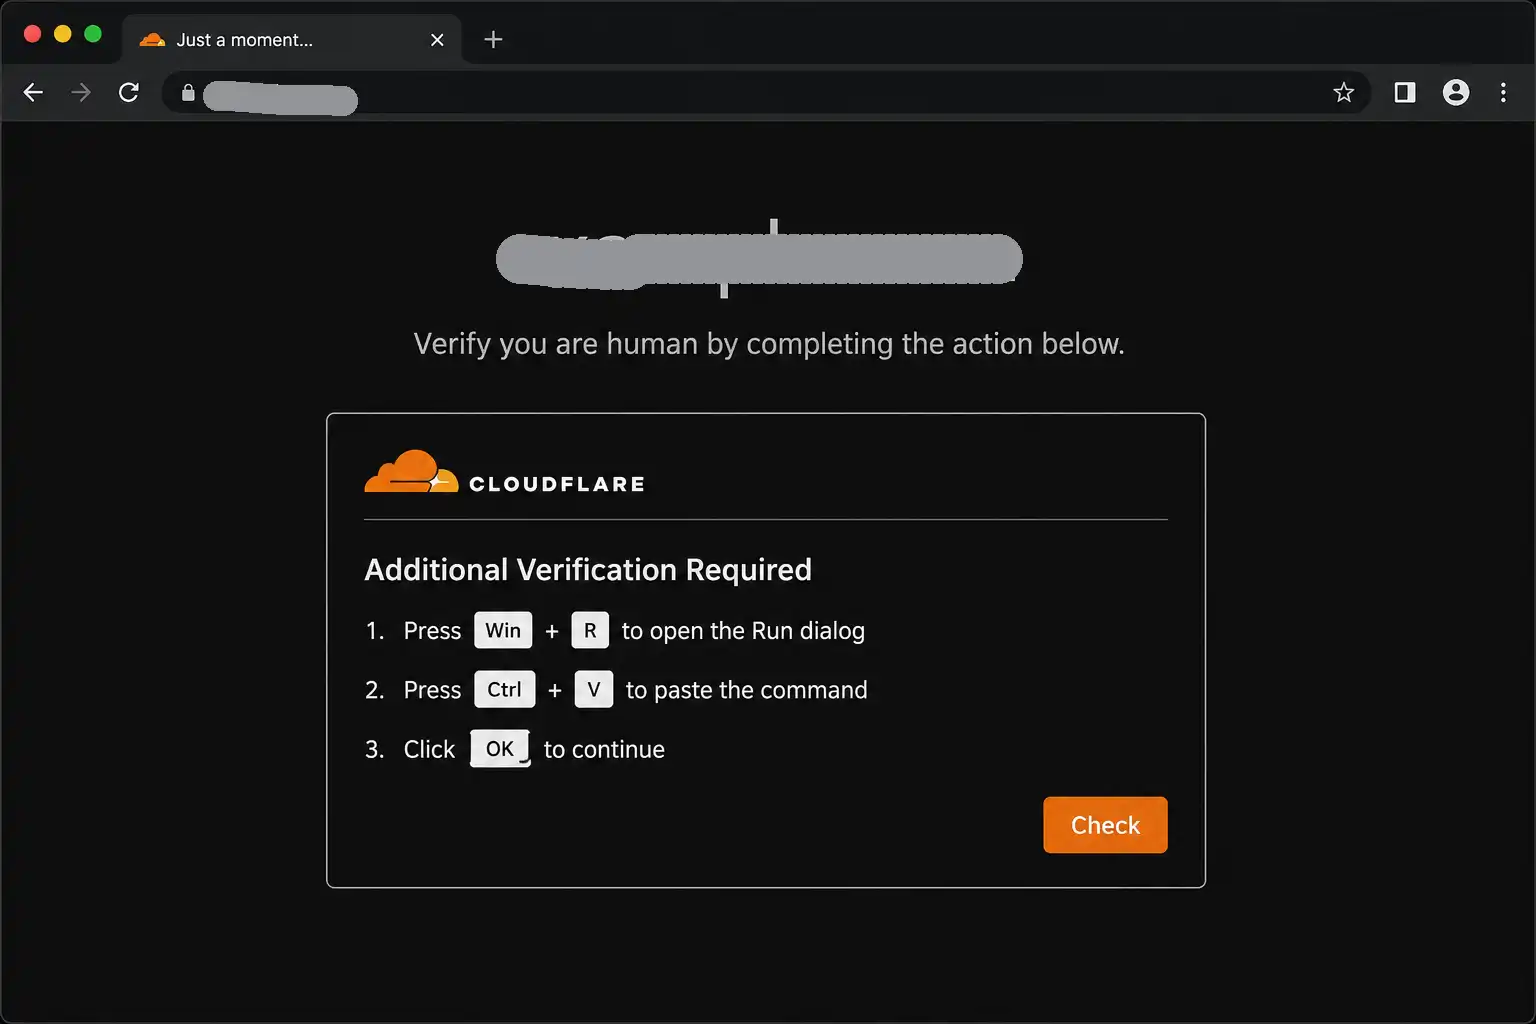
The genius of this attack is that the visitor infects themselves. The site only delivers the social engineering. Anti-virus tools see a person typing commands manually. Nothing flags it.
For the site owner (you and me), this is catastrophic in three ways:
- Real visitors get hacked through your site. Your reputation gets destroyed.
- Google flags your site as malicious. Rankings collapse. Search Console sends warnings.
- The attack is often conditional. It only shows for certain visitors (specific referrers, cookies, geo-IPs, or user agents). The site owner often does not see it from their admin browser. Visitors report problems. The owner sees nothing. Hours of confusion.
I learned the third point the hard way.
How I Discovered My Site Was Infected
I visit my own sites in incognito mode every week. It is a habit I picked up from years of doing WordPress speed optimization work. You catch issues regular visitors see that you would miss in your logged-in admin session.
That habit saved this site.
When I saw the fake Cloudflare page, I knew within five seconds what it was. I had read about ClickFix campaigns earlier in the year. Reports from Rapid7 and Sekoia tracked thousands of compromised WordPress sites. I never thought one of mine would be on the list.
The Ray ID at the bottom of the fake page was the giveaway. Real Cloudflare Ray IDs follow a specific format. The malware fakes the look but uses a random string. Once you know what to look for, the difference is obvious.
But spotting an attack is one thing. Removing it is something else.
The 8 Hours I Spent Trying to Clean It
I am going to be honest. Most of what I tried did not work. Walking through it might save you time if you ever face this.
Hour 1: Free scanners
I tried free malware scanners first. Wordfence free showed some suspicious files. Sucuri Site Check flagged the site as malicious but only listed generic warnings. Both wanted paid plans for actual cleanup. I did not have money to spend on a paid cleanup that might still miss something.
Hour 2: cPanel file manager
I opened cPanel and started browsing wp-content/uploads/ looking for PHP files that should not be there. I found a few. mailchimp-for-wp/debug-log.php, wpforms/cache/index.php, and others that turned out to be legitimate plugin files. Some looked suspicious but I could not tell which were real attacks and which were normal.
Hour 3: Plugin deactivation
I deactivated every plugin from the WordPress admin. Reloaded the site in incognito. The fake Cloudflare page still showed.
That ruled out the plugins. The malware was somewhere else.
Hour 4: Theme file inspection
I opened my active theme (Kadence) files in cPanel. Checked functions.php, header.php, footer.php, and index.php. Read them line by line.
Nothing obvious. No eval(base64_decode(...)). No weird include statements. No external script URLs.
Hour 5: View source confusion
I tried view-source: on the attacking page. The HTML I got back was clean. No malicious scripts. No fake Cloudflare overlay code anywhere.
This was the moment I realized: the attack was conditional. The server was checking who visited and only injecting malware for specific conditions (probably first-time visitors or visits from search engines). When I downloaded the source with curl, it came back clean. When my friend visited from his phone, he got the fake Cloudflare. When I visited in incognito, sometimes yes, sometimes no.
This kind of conditional injection is the hardest to debug. You cannot grep the server for malware if you cannot reliably reproduce the attack.
Hour 6: Hitting the wall
I tried everything I could think of. Reinstalled WordPress core via cPanel’s softaculous reinstall. Replaced theme files with fresh downloads. Checked mu-plugins folder. Read .htaccess carefully. Searched the database for <script and eval( and cloudflare in wp_options and wp_posts.
The attack still showed up sometimes. Sometimes not. I could not find where it was loading from.
I was exhausted. I could not afford to keep fighting blindly. I had to change strategy.
The Strategy That Actually Worked
At the 7 hour mark I made the decision: stop trying to clean the existing install. Build a clean one. Move only the content I trust.
Here was the plan:
- Create a subdomain (
example.comstyle isolation, separate from main domain) - Install fresh WordPress on the subdomain
- Install fresh Kadence theme (from kadencewp.com, not from the infected install)
- Install needed plugins fresh from wp-admin
- Export only the content (posts, pages, categories, comments) from the old site as an XML file
- Import the XML into the new install
- Manually copy the uploads folder for images
- Verify clean
- Move the new install to replace the old infected one
- Lock everything down so it cannot happen again
This is a known recovery pattern. But two practical problems blocked me immediately.
Problem 1: The WordPress Importer Could Not Handle My File
My XML export was 12MB. Not huge. But the default WordPress Importer plugin from wordpress.org/plugins/wordpress-importer/ failed every time. PHP upload limits, memory limits, execution timeouts. I increased every limit my host allowed. Still failed.
I tried WP All Import. Too complicated for a simple WP-to-WP transfer. It asked to “modify” my posts. I did not want to modify anything. I wanted everything to import exactly as it was on the old site. Same titles. Same URLs. Same dates. Same slugs.
The old Blogger Importer plugin (which used to handle these imports for me) has been broken for over a year.
Problem 2: Copied Images Did Not Show in Media Library
I zipped wp-content/uploads/ on the old site, downloaded it, uploaded it to the new install, unzipped. All my images were now on the new server.
But the Media Library was empty. WordPress reads media from the database (the wp_posts table), not the filesystem. Just copying files does nothing.
I needed a tool that would scan my uploads folder and register every file into the Media Library.
I could not find a free plugin that did exactly this without limitations or upgrade prompts. So I built one.
The Two Plugins I Built (Both Free)
After my migration worked, I cleaned up the code and packaged the plugins so anyone can use them. Both are free. No premium upgrade. No “lite version” tricks. Full features in the free download.
Plugin 1: SERPsKit Content Migrator
This is what fixed Problem 1 and Problem 2 above.
What it does:
- Imports WordPress WXR export files (the .xml file from Tools → Export) of any size
- Uses streaming XML parsing instead of loading the whole file into memory
- Processes the import in small AJAX chunks so PHP never times out
- Preserves everything exactly: titles, slugs, URLs, dates, categories, tags, comments, post meta
- Smart attachment handling: if an image already exists in your
wp-content/uploads/folder, the plugin registers it locally instead of re-downloading - Falls back to downloading from the old site if a referenced image is not local
- No prompts during import. No “modify your posts” steps. It just imports.
Includes a second tool: Media Sync
The Media Sync tool scans your wp-content/uploads/ directory and registers every image, PDF, and video file into the WordPress Media Library. Use it when you have copied files manually (like I did) and they do not appear in Media → Library.
Download SERPsKit Content Migrator (free): Send a message to get my content migrator for free, its like Blogger importer (but the blogger importer not supporting now), can import xml and images both to restore whole site.
Plugin 2: SERPsKit Security Kit
After my clean migration was done, I needed to make sure this never happened again. Generic security plugins like Wordfence are good, but they overlap a lot with other tools and are heavy on resources. I wanted one focused plugin that did exactly what mattered for preventing ClickFix-style attacks.
What it does:
The plugin combines a malware scanner with active hardening protections.
The hardening side (turns on automatically after install):
- Disables XML-RPC (a common brute-force entry point)
- Blocks user enumeration via
?author=Ntricks - Limits failed login attempts (5 tries, then 30 minute lockout)
- Filters dangerous file uploads (blocks PHP, exe, shell scripts)
- Hides WordPress version from public sources
- Sends security headers (X-Frame-Options, X-Content-Type-Options, Referrer-Policy)
- Blocks PHP execution inside
wp-content/uploads/(the #1 attack vector) - Emails you when a new admin user is created, a plugin is activated, or a theme is switched. Even an attacker who logs in cannot quietly take over.
The .htaccess hardening (one click apply):
The plugin writes server-level rules to your root .htaccess and wp-content/uploads/.htaccess. These rules:
- Block direct access to
wp-config.php,.htaccess, andreadme.html - Block
xmlrpc.phpentirely - Deny PHP execution in uploads at the web server level (so even if malware is uploaded, it cannot run)
- Catch and block common exploit query strings
- Force HTTPS
These rules run before WordPress even loads. A webshell uploaded through a vulnerable plugin cannot execute. The ClickFix attack chain breaks at this point.
The scanner side (on-demand):
- Compares every WordPress core file against the official wordpress.org checksums
- Finds PHP files anywhere in
wp-content/uploads/(where they should not exist) - Scans every theme and plugin file for known malware signatures including the exact patterns used by the ClickFix campaign
- Detects suspicious admin accounts created in the last 30 days
- Finds injected JavaScript in database options and post content
- Reports rogue mu-plugins (which auto-load and survive plugin deactivation)
Quarantine workflow:
Nothing is auto-deleted. The scanner reports findings. You review each one and either quarantine (move to a blocked folder, fully reversible) or delete permanently. Every action is logged.
Download SERPsKit Security Kit (free): Send a message to get my security kit for free.
What I Learned (So You Do Not Repeat My Mistakes)
If you take nothing else from this post, take these:
Audit your plugins. Most WordPress compromises start with a vulnerable plugin. Open your Plugins page right now. For every plugin you have not used in 3 months, delete it. Deactivated plugins still create attack surface because their files sit on your server.
Update everything weekly. I set a calendar reminder every Monday. Update WordPress core, all plugins, all themes. The ClickFix campaign exploits known vulnerabilities. Sites that update lose this race.
Use unique strong passwords on cPanel and WP admin. Both. Different. 20+ characters. Use a password manager.
Enable two-factor authentication. On both cPanel and WP admin. This single step blocks most credential-stuffing attacks.
Visit your own sites in incognito mode regularly. Once a week. From a different browser if possible. From your phone. You will catch issues you cannot see from your logged-in admin session.
Back up everything. Files and database. Off-server (Dropbox, Google Drive, S3, anything not on your cPanel). Once a week minimum. If I had a clean backup from 30 days ago, I could have restored in 20 minutes instead of spending 8 hours fighting.
Stop hosting many sites on one cPanel. If one gets compromised, the others can be infected through shared filesystem access. Use separate cPanel accounts or different hosts for critical sites.
How to Protect Your WordPress Site Today
Here is a quick checklist you can run through in under an hour:
- Install SERPsKit Security Kit (free), let it run with default settings, click “Apply .htaccess hardening”
- Run the malware scan. Review and clean any findings.
- Go to Plugins → Installed Plugins. Delete every plugin you do not actively use.
- Update WordPress core, all remaining plugins, and your theme.
- Change your WP admin password to something 20+ characters.
- Enable 2FA on cPanel and WP admin.
- Set up off-server backups (UpdraftPlus to Google Drive works well for free).
- Open your site in an incognito browser. Verify everything looks right.
If your site is already infected and you cannot figure out how to clean it, the migration approach worked for me. Build a fresh install on a subdomain, import only content (not the database), and use my plugins to make the transfer painless.
Why I Am Giving These Away Free
I run SERPsKit as my freelance business. I sell paid WordPress plugins like the Amazon Affiliate Kit and the SERPsKit Pricing Table. I also offer services like WordPress speed optimization and custom WordPress website design.
But security tools should not be paywalled. If someone is currently being attacked, they need a working solution today, not a sales funnel.
Both plugins are free forever. No upsells inside the plugin. No “premium features” hidden behind a paywall. The same code I use to protect my own sites is what you download.
If they help you and you want to support my work, the best way is to share this post with other site owners. Or check out my free SEO tools if any of them are useful for your work.
Final Thoughts
This attack scared me. I have built WordPress sites for almost a decade. I thought I knew what to look for. The ClickFix campaign is sophisticated enough to bypass casual security audits and clever enough to hide from the site owner while attacking visitors.
The good news: with the right protection, this attack is preventable. PHP execution in uploads is the single weakest link in most WordPress installs. Block that one thing and the entire ClickFix chain breaks.
If you want to chat about your site’s security, you can always reach me here.
Stay safe.
Sukhen